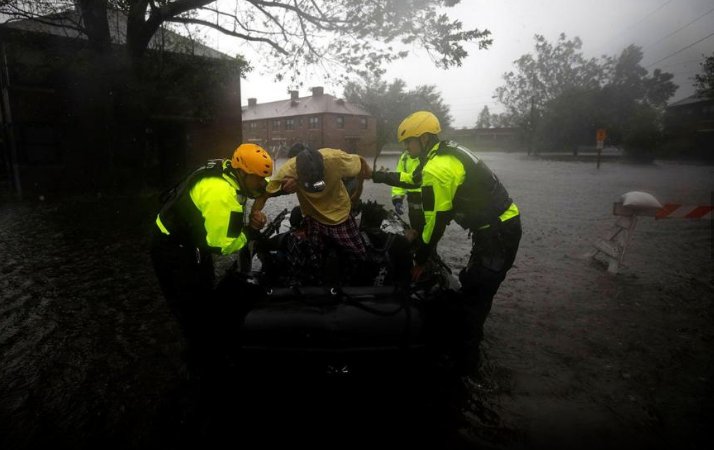
#DallasThread #Thread #Hurricane #HurricaneFlorence #Flood #Cleanup As the flood waters recede, I want to talk to you about cleaning up. I have received training in disaster relief and sadly have had to use this training.
While this thread is not in-depth, it will be most useful info in one place that I think you will find. It’s also a bit long. Sorry not sorry 😬
Let’s start out by stating the obvious, unless you are saving another human, nothing is worth risking personal sickness or your life for. You must protect yourself first in disaster areas. If it takes another day to get the right gear, wait that day.
You becoming a burden on the system because you did not take the proper precautions only serves to hurt those in more need around you.
Until the area is tested or you are told different, treat anything you touch as caustic (Chemical burns)/ pathogen filled (sewage)/ skin permeable (touching gives you exposure) etc. This goes for everything in the area. Including the dry spots.
New professionals note: As people stream into the affected areas, safety equipment will become short in supplies so, have a backup plan to get substitutes. (See advice to civilians)
Civilians: Your go to for safety equipment is my backup equipment. It is just as effective, just a bit more cumbersome. All of it can be had locally at your big box stores.
Nitrile gloves- The thickest you can buy. They have the widest protection against chemicals. Harbour Freight tool has extra thick long cuff Mechanics Gloves that fit the bill amazingly well.
Over gloves- Over gloves should be soft on the inside with cut proof palms. Rubber coated gardening gloves of tuff gloves are great over gloves.
Dust Mask/ Respirator- At no time should you be without respiratory protection till the area is clean. The minimum you should be using will have an N95 rating.
A surgical style mask filter has a ~2hr working time. If you are sweating in the mask or it gets wet, you are reducing its working time. A respirator with filters will have an ~8hr working time. Plan accordingly!
Eye Protection- At a minimum, glasses are a must to prevent splashes into the eyes. The next level is goggles. These however often fog and are uncomfortable for most to wear. The best solution is a face shield like wood workers wear...
...That will cover your whole face and your mask with minimal fogging.
Clothing- You will need over clothing that can be disposed of once you leave the site/area. This will prevent the transfer of hazardous materials to clean areas like your car or temporary housing.
Tyvek painters suits are as good as what the professionals are wearing. 1 piece is preferred but a 2 piece suit can be made 1 w/ duck tape.
Can't find any painters suits? Tyvek house wrap is the same material, often just a bit thicker. Lay it out on clean ground, lay down on it & loosely trace your body. Make a copy & duck tape it at the edges together.
Cutting a slit from the neck hole 2/3rds down the back will make your new work suit easy to get into.
Tyvek offers the best protection for a breathable material. I do not recommend rain suits of unknown plastics or materials. They can easily melt when exposed to chemicals or worse not protect you at all.
Shoes- Rain boots/ farm boots/ crap kickers/ wellies... that are calf or knee high with a rugged tread. If you cannot wash off your boots at the end of day, you are wasting money in the disposal of them after each wear.
If your boot develops a hole, it’s time to get a new pair. Your over suit needs to be duct taped over the top on the outside of the boot. That way if you are splashed or something falls on you, it will not fall into your boot.
Please note the following statements: -A "safe" area is not the same as a clean area! Pay attention to how the local government phrases this.
-Dry mud is just as hazardous as wet mud. The dust & dry dirt is often more concentrated with hazardous chemicals/ pathogens. You will often not see the dust from this dirt in the air.
-If you need a SCBA (Self Contained Breathing Apparatus or SCUBA tanks) to be in an area, You should not be in that area as a civilian. You are tempting death and placing a new burden on the system.
Clean= Pre-disaster chemical levels & pathogens in the environment.
Safe= The environment with limited/ monitored exposure is below gov. tolerances 4 exposures.
Safe= The environment with limited/ monitored exposure is below gov. tolerances 4 exposures.
Do not take your safety equipment que from the responding gov. agency’s, they are mission first, safety (arguably) second and better trained in the hazards they are facing. This tends to make them seem more lax in their precautions.
A good example of this is everyone involved in the 9-11 response and clean up. Cancer rates for these responders is astronomically high. This has been traced to high intensity short term exposures to the area.
Now that we have your personal safety addressed, let’s talk about the items you will be saving and those you will be discarding. Everything that is going to cleaned or retained will need to need to be sorted on site.
Everything that cannot be cleaned or saved will need to be disposed of as soon as possible and removed from the site. Follow local guidance 4 disposal of these items. A system will be set up to take everything.
Items you will be keeping are to be placed in a heavy duty closable bag 10- 50 gallon heavy duty garbage bags work great for this. That bag is then placed in a safe holding placed away from disposable items.
Once you have a collection of “keep” bags it will be time to run them through a simple 3 position cleaning system.
Step one is to set up your cleaning areas to move your bags through. Each area will have a tarp bottom and be in close proximity to the next station...
...Each station has a person that will pass the item to the next station. Items can go back through the system if need for more cleaning, people cannot.
Step 2 is to rinse the outside of 1 bag at a time on site before it is moved to the 1st cleaning station. That bag is then moved to the first cleaning station.
Station 1- Opening area of the rinsed bag. Separation of items for first clean. Any harsh cleaning will happen at this station. Removal of cakes on mud etc. Once the item is cleaned, it is handed to the next station & another bag is opened. Bag stays in this area for disposal.
Station 2- Fine cleaning and sterilizing will happen in this area. Items are only allowed to pass beyond this area once they are clean / sterilized.
Station 3- In this area, the items will get a final inspection for cleanliness. Any damage is noted for future repairs or replacement. Once that is done, the items are packaged for storages and the packaged are tagged for contents.
While the above process is very simplified, it’s meant to get you started. Cleanings of your items will differ as will the amount and style of your stations. You can always add in more cleaning and packing stations as needed.
This cleaning process is the most efficient if it’s set up between multiple houses and ran for as long as there are items to be cleaned. Help your neighbours as you help yourself.
One last item, let’s talk saving paper. I am are sure an archivist will have a few words to say on this. This method is only meant to save your papers for replacement. Having an original always makes getting a copy easier.
Your paper will also go through 3 cleaning stations much like everything else. The difference is the stations will be tubs of distilled water.
Station 1- Distilled water in a tub for a first rinse after gently brushing off any excess dirt.
Station 1- Distilled water in a tub for a first rinse after gently brushing off any excess dirt.
Station 2- More Distilled water and a very mild no bleaching soap. You are just trying to remove enough
...dirt to identify the paperwork here.
Station 3- A final rinse in distilled water and drying.
Station 3- A final rinse in distilled water and drying.
To dry your paper you will need two 4 foot by 4 foot square frames made out of 1 inch pvc pipe & 90 deg. connectors. Across each square you will stretch nylon window screen and affix it with zip ties. If done right you will have 2 tight flat window screens to place your paper on.
Once your paper is through it’s final rinse, lay it out on the top or flat side of the screen. Once the paper is laid out, take the other screen and place it on top of your papers flat side down and clamp the screens together.
This will hold your paper flat and let it dry evenly. Let your paper dry in the shade, the sun will easily bleach it.
I hope this helps. The clean up is going to take longer than you think and it’s going to take a lot of documenting of items. Please keep a constant thought on your health and safety as well. You can do this and there will be help & support. -Dallas
Oh, one last thing. If you could, will you please RT this thread to your feed. My hope is if it goes viral, I will not have to repost it for the next hurricane. It will just be searchable at that point. Thank You -Dallas